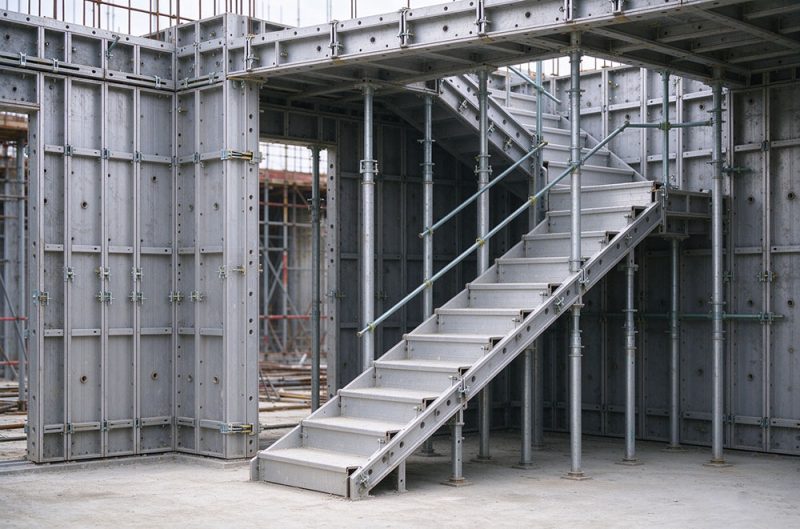

How to Build, Calculate and Strip Concrete Stair Formwork
Stair formwork is the most exacting element in a concrete frame. The geometry is fixed by ergonomics and building codes rather than by the structural engineer’s convenience, every riser must match to within a few millimetres, and the stair is usually built late and needed early because it is the access route for other trades.
This guide covers setting out, the components, the build sequence, the formwork area and concrete volume calculations, and the rules for stripping.
Why Stair Formwork Is Different
A standard wall is just a flat box, and a slab is a flat box turned on its side. A stair is a set of boxes at varying heights on an incline, each step a different distance from the ground and a different load path back to the support.
Three realities make stair formwork harder than the rest of the frame:
- The geometry is unforgiving. Every riser must be identical to within a few millimeters. A ten-millimeter discrepancy between the bottom step and the top step is obvious to users and can fail a finishing inspection.
- It controls the program. The stair is usually the last element poured and the first one needed. It is the access route for other trades, so it carries program pressure from the moment it is set out.
- It is awkward to brace. A sloping soffit needs support that resists a component of the concrete load acting along the slope, not only perpendicular to it. Kickers at the base riser and props under the landing are necessities, not extras.

Setting Out Stair Geometry
Get the setting out right and the formwork follows. Get it wrong and no amount of carpentry recovers the shape.
The 2R + G Rule and Code Limits
Two conventions control stair proportions. First, the 2R + G rule: two risers plus one going should fall between about 550 and 700 mm, with 600 to 640 mm the comfortable band for most users. A 175 mm riser needs a going of roughly 250 to 290 mm to satisfy the rule. Second, local building codes limit individual dimensions. Under the Australian NCC, risers run from 115 to 190 mm and goings from 240 to 355 mm, with the 2R + G relationship applied on top.
Dividing the Total Rise
Divide the total floor-to-floor rise by a target riser height to get the number of risers, then round to a whole number and recalculate. A 2890 mm rise at a 175 mm target gives 16.5 risers, which is impossible. Sixteen risers give 180.6 mm each; seventeen give 170 mm each. Choose the whole number, compute the actual riser, and use that actual figure for setting out rather than the target.
The number of goings is one less than the number of risers, because the top riser lands on the floor level. Sixteen risers means fifteen goings, plus the landing.
On site, establish the finished floor levels above and below from the survey datum, not from the slab as poured. Mark the total rise on a story rod. Set the landing position first, because the landing is the fixed point everything else references. Then divide the flight into equal risers.
Types of Concrete Stairs and Their Formwork
- Straight flight: One continuous run from level to level, or two runs with a landing. The simplest case, needing a sloping soffit with standard riser boards.
- Dog-leg or switchback: Two flights moving in opposite directions sharing a half landing. The most common form in residential and commercial buildings. Two sloping soffits meet a horizontal landing, and the landing is supported independently.
- Open-well stair: Flights wrapping around a central void with a visible stringer. This needs a finished soffit, often fair-face, so the formwork face quality controls the result.
- Cantilever or spine stair: Steps cantilever from a central spine wall. The formwork per step is small but the number of distinct elements is high, and the reinforcement detail usually governs the program rather than the formwork.
- Spiral and curved stairs: Every step is a different shape. Hand-built formwork or a purpose-made curved form; modular systems do not apply.
- Precast stairs: Cast in a yard and lifted into place. The formwork is a steel mold used repeatedly, and site work reduces to setting and grouting. This removes the stair from the critical path, which is often worth more than the extra unit cost.
Components of Stair Formwork
- Soffit panel or stringer: The sloping face forming the underside of the waist slab, built from film-faced plywood on timber bearers or from aluminum soffit panels.
- Riser boards: The vertical boards forming each step face. Because riser height sets the tread level, these must be cut accurately. Riser boards are braced back to the soffit with cleats.
- Side shutters: Boards closing the ends of the steps, fixed to the stringer or the wall. On a flight against a wall, one side is the wall itself.
- Waste or boxing: The formwork closing the top of the flight where it meets the landing, and the bottom where it meets the slab.
- Landing formwork: A horizontal soffit, propped from below and designed as a suspended slab.
- Bracing and kickers: Kickers hold the bottom riser position. Props or braces resist the along-slope component of the load. Bracing stops the assembly sliding during the pour, a failure mode unique to sloping elements.
- Release agent: Applied to the face before the reinforcement goes in. See our specification for film-faced plywood for formwork.
How to Build Concrete Stair Formwork Step by Step
- Confirm the joint position: Decide where the construction joint sits before any formwork goes up. The stair is poured either with the wall it abuts or as a separate operation with a joint at the wall.
- Set the soffit line: Mark the top of the soffit at the bottom of the flight and at the landing. This line is parallel to the finished tread line, offset by the waist thickness plus the step depth.
- Erect the soffit support: Place props at 900 to 1200 mm centers under the sloping soffit, with bearers spanning across them. Props must be set perpendicular to the soffit, not vertical, or they will bend under load.
- Fix the soffit panels: Lay panels from the bottom up, so each panel is supported by the one below and laps run in the direction of the pour. Seal the joints against grout loss.
- Set the riser positions: Measure every riser from the landing datum, not from the previous step, to prevent errors compounding down the flight.
- Fix the riser boards: Cut each board to the actual riser height, cleat it to the soffit, and check the top edge against a string line and a level taken from the landing.
- Fix the side shutters and waste: Close the ends and the junctions with the landing and the bottom slab.
- Brace the flight: Install kickers at the base riser and diagonal braces from the top side shutters back to a fixed point. Confirm the assembly cannot slide down the slope.
- Check the reinforcement: Verify cover to the waist slab, main bar spacing and anchorage into the landing and the slab below. Cover is the most commonly failed inspection on stairs, because the sloping geometry makes spacers hard to fix.
- Apply release agent and pour: Pour from the bottom of the flight upward so fresh concrete pushes against set concrete rather than running down the slope. Compact each step properly, because the riser face is where honeycombing shows.
Calculating Formwork Area and Concrete Volume
Two quantities have to be calculated for a stair: the area of formwork the contractor will be paid for, and the volume of concrete the pour will consume. Both follow directly from the geometry of the flight.
Formwork Contact Area
To calculate formwork contact area, add the concrete-contact surfaces that need a form.
- Soffit area = inclined length of the flight × flight width. Inclined length is the horizontal run divided by the cosine of the pitch angle.
- Riser area = number of risers × riser height × flight width.
- Side area = 2 × (waist thickness + step depth) × inclined length for a free-sided flight, or one side if the flight is against a wall.
- Landing = treated as a slab, so soffit area plus edge boxing.
For a flight 3.0 meters wide with a 4.5-meter horizontal run at 30 degrees, the inclined length is 5.20 meters, so the soffit alone is 15.6 square meters. Sixteen risers at 180 mm add 8.6 square meters of riser face. Side shutters add roughly 2 square meters per side.
Concrete Volume
Concrete volume breaks down into the waist slab and the steps.
Waist slab volume = inclined length × flight width × waist thickness. For a 5.20-meter inclined length, 3.0-meter width and 175 mm waist: 5.20 × 3.0 × 0.175 = 2.73 cubic meters.
Step volume = 0.5 × riser × going × flight width × number of steps. For a 180 mm riser, 280 mm going, 3.0-meter width and 16 steps: 0.5 × 0.18 × 0.28 × 3.0 × 16 = 1.21 cubic meters.
Total 3.94 cubic meters for the flight, plus the landing. Add five percent for the sloping geometry and the risk of over-pour at the bottom step. For the general method covering the rest of the frame, our guide on how to calculate formwork sets out the contact area approach for slabs, beams and columns.
When to Strip Stair Formwork
Stripping time is governed by the strength the concrete has achieved relative to the load it must now carry. ACI 347R-14 Section 5.7 covers removal of forms and supports. Hong Kong’s Buildings Department guidance states that formwork supporting in-situ concrete in flexure may normally be struck when the concrete reaches 10 N/mm² or twice the stress to which it will be subjected, whichever is greater.
Stripping Times in Practice
- Riser boards and side shutters: Can be removed after 24 to 48 hours, as they carry almost no load once the concrete has set.
- Soffit and props: Typically 7 days for a normal mix at 20 degrees Celsius, and longer in cold weather.
- Landing soffit and props: As a suspended slab, 7 to 14 days depending on span and load.
- Back propping: If following trades will load the stair before the concrete has matured, back props must stay in place.
Our guide on how long before removing concrete formwork covers the maturity approach and the variables that shift the answer.
Strip the risers first, from the top of the flight downward, so debris falls onto the lower steps rather than off the edge. Remove side shutters next. Remove the soffit props last, never all at once: work from mid-span outward and watch the soffit for deflection as each prop comes out.

Common Defects in Concrete Stairs
- Unequal risers: Caused by measuring step to step instead of from a single verified datum. The error compounds down the flight.
- Honeycombing on the riser face: Caused by insufficient compaction, or a pour that segregated while running down the slope.
- Grout loss at soffit joints: Joints not sealed, or panels that flexed under load. Seal with a compressible gasket or tape.
- Step edge chipping: Caused by stripping too early, skipping release agent, or levering tools against the step arris. Use a proper stripping bar and prise from the soffit.
- Waist slab thickness out of tolerance: Props that moved under load, or bearers spaced too widely. Check prop spacing against the design.
- Inadequate cover on the slope: Spacers not tied, sliding down the slope during the pour.
- A flight that misses the landing: Cumulative setting out error, or a landing level changed after the flight was set out. Always set out from the landing.
Safety on Stair Pours
A stair formwork is a working platform during construction as well as a mold. It needs edge protection on the open side of the flight, a means of access to the pour level, and temporary lighting that reaches the bottom of the flight.
Check props for plumb after the pour, because a prop that was straight under dead load can go out of plumb under the surge of a pour. Electrical leads and lighting on the wet sloping formwork face create a shock risk specific to stair pours.
Frequently Asked Questions
Riser boards and side shutters come off after 24 to 48 hours. The soffit and its props stay until the concrete reaches the strength the design requires, typically about 7 days for a normal mix at 20 degrees Celsius, longer in cold weather.
Add the inclined soffit area, the riser faces, the side shutters and the landing. The soffit area is the inclined length, being the horizontal run divided by the cosine of the pitch, multiplied by the flight width.
For a typical residential flight, 150 to 200 mm is common, and the structural design for the span sets the figure. It is not a formwork decision.
Yes. In a single-operation system the staircase is cast with the walls, slab and beams of a floor using the same panel set, which is standard practice in mass housing.
Measuring risers from the previous step rather than from a single datum. The error accumulates and the top step does not meet the landing correctly.
Yes. The step arrises are the thinnest part of the formwork and the most likely to break away on stripping. A proper release agent and stripping at adequate strength protect them.
Streamlining Your Stair Construction
Concrete stair formwork is unforgiving of slack setting out. The rise calculation comes first, the datum second, and every riser is measured from that datum rather than from the step below. Brace the flight against sliding, pour from the bottom up, and leave the soffit props until the concrete has the strength the design requires.
On highly repetitive work the calculation changes. Where a project needs many identical flights, moving the stair into a system formwork package removes the manual sequence and the setting out risk with it.
TECON supplies aluminum, steel and plywood formwork systems for wall, slab, column, stair and infrastructure work. Discuss your project details with the TECON engineering team, or review the full product range.